
YARA Threat Detection
This lab is designed to explore YARA detection rules along with auto-configuration of these rules using yarGen and testing with Arya, a tool used to create pseudo-malicious files.
Here are the repositories needed for this lab. While YARA can be run on Windows, we're going to conduct this in Kali Linux.
Repo for YARA:
Just type yara in the command line, if you don't have it, it should prompt you to download it.
Repo for yarGen:
Run the following commands from your shell:
mkdir ~/Yaralab
cd ~/Yaralab
git clone https://github.com/Neo23x0/yarGen.git
Repo for Arya:
For this command, make sure you're in your Yaralab directory still.
git clone https://github.com/claroty/arya.git
Repo for Lab:
Run the following command from your shell:
git clone https://github.com/Predd25/YARA-Labscript.git
Lab:
To begin, navigate to where you put the final file you downloaded (the .sh file), then type the following command:
***DO NOT RUN THIS COMMAND AS ROOT***
bash lab.sh
Navigate to your desktop, where you should now see a new file. For this lab, we'll say an end user noticed a suspicious document on their desktop. We're going to run some analysis on this to notate some IoCs.
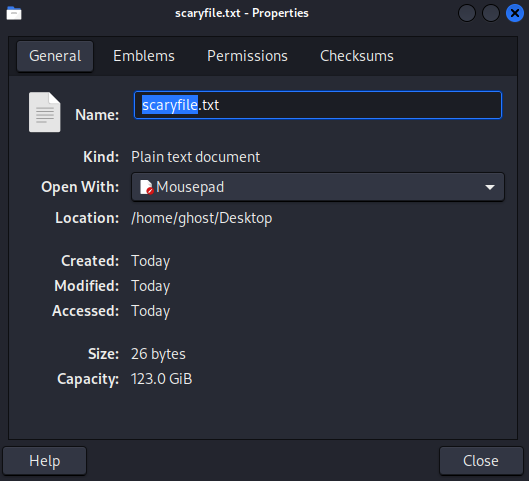
First, right-click the file and select 'Properties.' The initial IoCs we can obtain include the name of the file, the extension, file path, and size in bytes.
Next, we'll use the built-in Linux strings command to extract collections of characters that form human-readable text. Since this command often produces a lot of redundant characters, it's a good practice to pipe the output into a new .txt file.
Since this is a text file, you could simply use cat to display its contents or open it in a text editor. However, for real malicious files, particularly executables, using strings is more effective.
strings scaryfile.txt > scaryfilestrings.txt
Reading that scaryfilestrings.txt will show us the following strings:

Now, let's get the MD5, SHA-1 and SHA-256 hash for the file by using the following commands:
md5sum scaryfile.txt
sha1sum scaryfile.txt
sha256sum scaryfile.txt
Now that we have gathered all that information, our IoC list should look like this.
Next we will make a custom YARA rule. We'll be able to use YARA to hunt for any additional files that meet our IoC list. Go back into your Yaralab directory
Run the following command:
nano saferule.yara
When writing these rules, it's important to understand the following conditions:
Here is our example rule that we'll use for our demonstration.
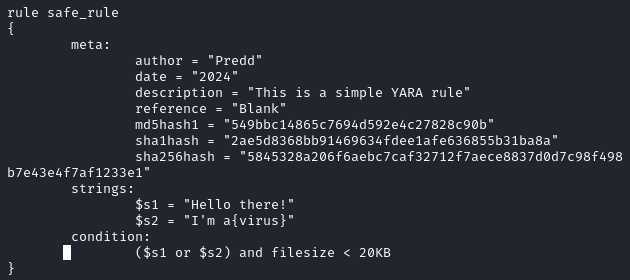
After setting that up and saving the file, we'll use the rule. Launch it with the following command:
sudo yara -m -s -r saferule.yara ~/ 2>/dev/null
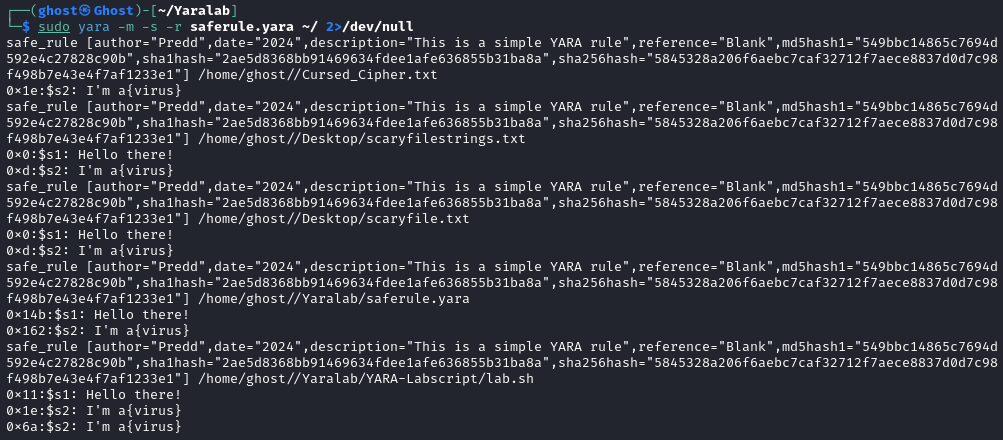
You will see hits for several files: scaryfile.txtstrings.txt, scaryfile.txt, saferule.yara, and lab.sh (please ignore lab.sh). We are already aware of these files. However, there is one new file: Cursed_Cipher.txt, located in the /home/%USER%/ directory.
Navigate to Cursed_Cipher.txt and extract all its Indicators of Compromise (IoCs) as we did earlier. With this information, you can update our saferule.yara rule.
Additionally, let's reduce some of the hash information in our rule, as it's not necessary for searching for files. However, it's good to save those IoCs separately for future reference.
The updated rule should look something like this:
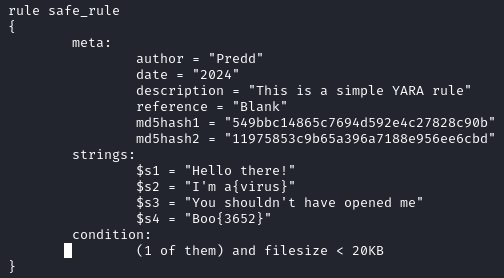
Once that is updated, run the following command:
sudo yara -m -s -r saferule.yara /tmp 2>/dev/null

Now that we've practiced writing YARA rules manually, we'll use yarGen to automatically generate rules based on the files present on our system.
cd ~/Yaralab/yarGen/malwarez && ls
Here, you'll find a file called Sinister_Script.txt. As before, we'll collect its IoCs to help construct our new rule. Once you've done that, navigate to your yarGen folder and run the following commands:
pip install -r requirements.txt (if you don't have pip, just enter pip, it will prompt you for downloading just like YARA)
python yarGen.py --update
python yarGen.py -m ./malwarez/ -o autosaferule.yara
Note: If your system is killing the process while it's running, you need to give your VM more RAM.
Once the new rule is created, open it to view its contents. Notice how it saves us the effort of manual creation? This is particularly useful for large-scale systems with extensive rule sets. However, it's also essential to review the rule to ensure everything is correct. Here is our example:
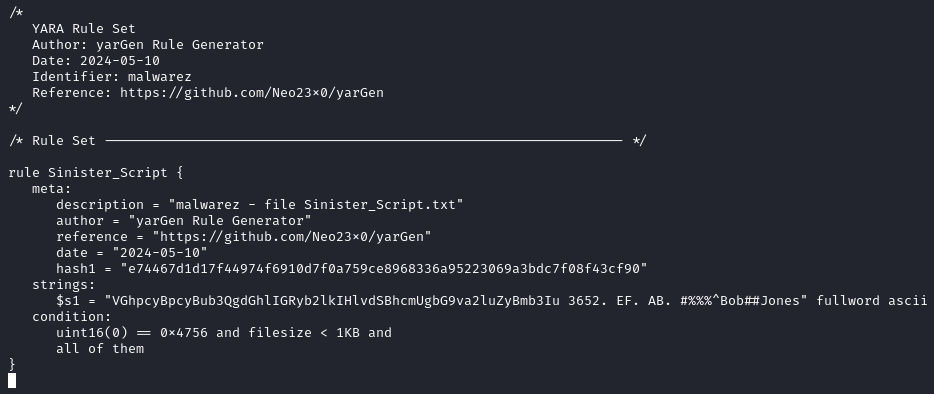
Now let's go ahead and run this rule with YARA to prove that it works:
sudo yara -m -s -r autosaferule.yara ./

Lastly, we'll use Arya to produce pseudo-malicious files designed to trigger YARA rules. Think of it as a reverse YARA, as it creates files that match your rules.
sudo apt update
sudo apt install yara cmake
cd ~/Yaralab/arya/
pip3 install -r requirements.txt
Once that's set up, we'll create another manual YARA rule to test against Arya.
Note: You may need to install yaramod and xeger, as these packages require updates. If you encounter errors with the last command, try installing the following:
pip install yaramod
pip install xeger
The IoCs we'll add to it include the following:
Strings:
Hex:
Other file attributes:
You're more than welcome to experiment and add more to your rule. Run this command here to execute arya:
python3 ~/Yaralab/arya/src/arya.py -i "path to your rule" -o test.exe
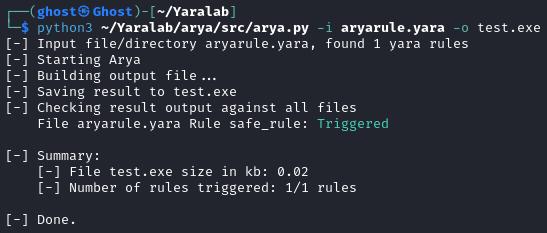
If everything goes according to plan, Arya will indicate that your rule has been 'triggered.' If it doesn't, don't lose hope! Experiment with different approaches until you achieve success. Arya isn't flawless, but it serves as an illustrative example. For instance, you might have partial data about a malware file, like certain strings mentioned in an article, but lack the actual malware sample for testing your rule. Arya becomes invaluable in such scenarios. While not indispensable, it can be quite handy in specific situations.